Bitmap Tri-Color Marking
Bitmap Tri-Color Marking
In this post I look at a simple tri-color marking implementation that uses bitmap operations to walk the heap.
Recently I’ve been experimenting with various garbage collection implementations, with an eye towards one of my possible future projects. This has lead me down all manner of paths, many of them false, and all of them great fun. One particular approach stuck with me for quite some time after I had abandoned it, so I thought I would share this approach.
Before we get going with the details of this approach, I thought I’d set the scene a little with an overview of the garbage collection mechanism known as tri-color marking.
What is Tri-color Marking
Tri-color marking was first described I think by Dijkstra et al as part of the garbage collector for a LISP system. This algorithm is used as an enhancement to a simpler mark-and-sweep approach.
Tri-color marking describes a process that walks the heap and assigns each object a color: white, grey and black. Each colour has a particular meaning:
- White objects are objects which, once the process has completed, we are confident are no longer referenced. These are often called the condemned set, as they’re going to be freed.
- Grey objects are ones that we’ve found have pointers to, but we’ve yet to scan them for pointers to other objects.
- Objects that are marked black are ones that we’ve discovered pointers to and which contain no pointers into white objects. We keep these objects.
An important feature of the tri-color marking process is the tri-color invariant – no objects in the black set reference objects in the white set.
To perform the tri-color marking process we need to begin at the roots. A root is a pointer into the heap that we use to initialize the marking process. Roots are typically found on the stack or in registers.
When we start our marking process we take all the roots and place the objects into the grey set. The rest of the objects go into the white set and the black set starts off empty.
The process of tricolour marking is quite simple:
- Take a pointer from the grey set.
- Move it to the black set.
- Examine the pointed to object and see if it has any pointers to white objects.
- For every pointer to an object in the white set, move the object from the white set to the grey set.
The process continues until the grey set is empty. Expressed in pseudo-code, the process is even easier to describe:
while grey_set is not empty:
  grey = grey_set.pop()
  black_set.insert(grey)
  for pointer in *grey:
    if pointer in white_set:
      white_set.remove(pointer)
      grey_set.insert(pointer)
At the end of the marking process the grey set should be empty. The black set contains all the objects that we want to keep and the white set contains the objects that we want to release.
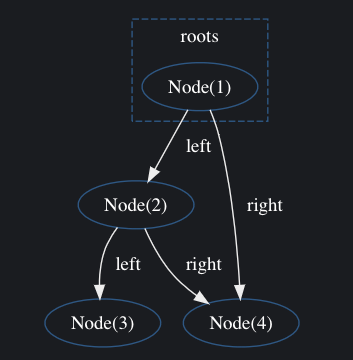
As an example, let’s consider a structure that we’re going to allocate on our heap. We’re going to use a simple binary tree, where each element in the tree maintains three fields: one of some parameter type and two pointers to each of the left and right child nodes. We’ll describe this as the following structure:
struct Node {
  int   value;
  Node *left{nullptr};
  Node *right{nullptr};

  Node(int v): value(v) {
  }
};
When we construct a Node object we pass in our value type. We can then link the nodes together using their left and right pointers. As an example, consider the following code that constructs a simple tree.
auto first = new Node<int>(1);
first->left = new Node<int>(2);
first->left->left = new Node<int>(3);
first->left->right = new Node<int>(4);
first->right = first->left->right;
We can visualize the heap now as a graph of Node objects that refer to each other in a tree structure.
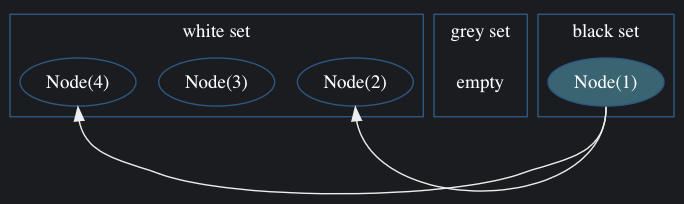
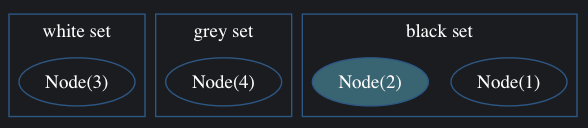
Let’s now work through the tri-color marking process. We first establish our initial colored sets of objects.

Our grey set contains our single root, being the object pointed to by the first variable: Node(1). Our white set contains all the other objects.
The first pass of the tri-color marking process will see that the grey set is not empty: it contains the first node we allocated, which is pointed to by our root. We move it to the black set, as we want to preserve it.

We then scan the object and find any pointers to objects in the white set. We find that it does indeed have two such a pointers in it’s left and right fields.
We have now established that these objects are live, so we no longer want them in the white (condemned) set. We move these two pointed-to objects from the white set to the grey set.
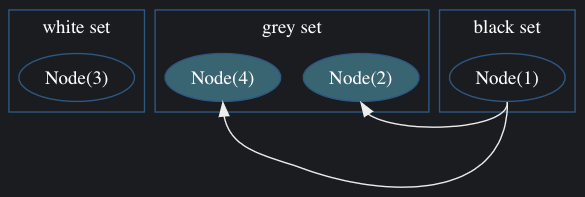
At this point the first pass of the tri-color marking process has moved our initial root object into the black set to keep and marked two other objects for scanning.
In the second iteration we see that the grey set is not empty, so we continue with our marking by taking an object from the grey set and moving it to the black set before scanning. We’ll take the Node(2) node first, moving it to the black set.
We then scan the Node(2) object for any pointers to objects in the white set. We find one such an object: Node(3). Note that the object Node(4) is pointed to by Node(2), but it is not in the white set.
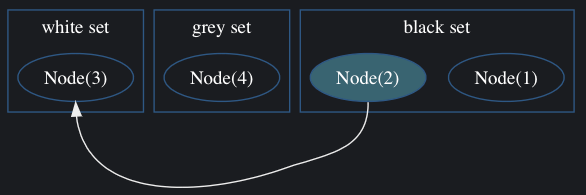
We move the object Node(3) from the white set to the grey set for processing.
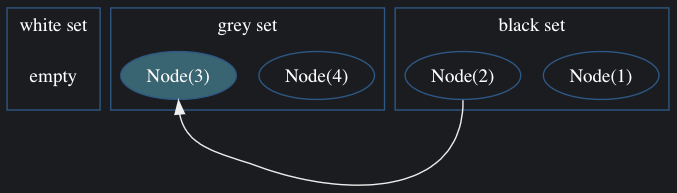
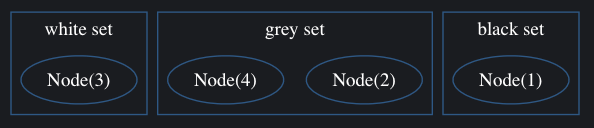
For the third pass we find that the grey set is still not empty, so we take an object from the grey set and move it to the black set. The next node we’ll process is Node(4). This node is moved to the black set and then scanned for pointers.

We scan Node(4) and find no pointers into the white set. The fourth pass discovers the grey set is still not empty. We’ll pick the next grey node Node(3) and move it to the black set.

We scan Node(3) and find no pointers. With the final pass complete the grey set is empty. The objects that we want to keep are in the black set and the white set is empty. We have nothing that we want to free.
The tri-color marking technique is quite a nice approach. Two behaviours that I found to be quite interesting where as follows.
- We only scan objects that we reference, and
- The number of passes is a function of the longest object chain.
These two behaviours manifested in different ways during testing. The first feature – we only scan what we reference – really started to appear when the program allocated a lot of objects during processing, but didn’t retain many of them. One such example was loading a particularly large JSON file. The parser constructs a value tree that represents the JSON, performing all manner of allocations along the way. Once the salient processing had been completed, however, only certain objects were retained. As the tri-color marking only visits objects that we reference, once the parse tree had been processed and discarded it was no longer scanned.
The second behaviour – the number of passes are a function of the longest object chain – became quite apparent in tests that involved long chains of objects. Again, the JSON parser was a culprit of this behaviour of the marking process. If the GC executed whilst the parse tree was being referenced, multiple passes were required to walk all the nodes of the AST. Indeed this was quite likely: the JSON file was quite large, and the memory pressure increased quite drastically, often triggering multiple minor GC passes whilst the tree was being built.
Bitmap Marking
The part of the approach that stuck with me was the use of bitmaps to perform the tricolor marking process. To start this off, imagine we performed allocations within a set of blocks. Each block describes a region of memory that our allocator will meter out for each allocation request.
During collection, each block maintains a grey bitmap. Each bit of the grey bitmap corresponds to a pointer-sized region of the block that is allocated to an object that is in our grey set.
Each block also maintains a remembered set: a set of pointers that live within the block. These pointers may point to memory within the same block as the pointer resides, within other blocks, or even outside the heap.
During collection we populate a white bitmap with the pointers from the remembered set. The intersection of this white bitmap with the block’s grey bitmap are the white pointers that reside within a grey region. We can then promote these pointers to the grey set by settings the bits in the bitmap that correspond to the promoted grey objects.
To describe this process, let’s start off by defining our block GC information structure. We’ll call this structure BlockInfo.
struct BlockInfo {
  PointerSet  remembered;      // The remembered pointers in the page
  Allocations allocations;     // Allocated cell bitmaps
  PtrBitmap   black_set;       // Memory that is live
  PtrBitmap   grey_set;        // Memory that is live, but to be scanned
  PtrBitmap   white_set;       // Pointers that are to be scanned
};
The first field in the BlockInfo structure is the remembered set. This can be defined quite simply as an std::set of pointers to our pointer type.
struct Pointer {
  void *ptr;
};

using PointerSet = std::set<Pointer *>;
Every time that we allocate an object in a Block, for every pointer in that object we add a Pointer* to the remembered set.
The next field in the BlockInfo structure is the allocations structure. This could be implemented using two bitmaps, where each bit in a bitmap corresponds to a cell in the block. Each block is subdivided into minimum allocation units called cells. Each cell can be any size really, but I typically used 16-bytes as a reasonable minimum allocation unit. The structure maintains one bitmap of allocated regions and another of allocation starting points.
For example, consider the following allocation bitmaps:
regions: TT--TTTT----TTTT
starts : T---T-------T-T-
We can see that this represents four allocations in a block of 16 cells. The usefulness of the allocation start bitmap is that it allows us to iterate through the allocation themselves: each bit is the first cell in an allocation of one or more cells. The allocated region bitmap allows us to ascertain whether a particular cell is allocated or not, and thus the extents of the allocations.
The last three fields of the BlockInfo structure are the white, grey and black sets. These bitmaps are not based on the size of a cell, but on the size of a pointer: each bit represents a region that is exactly the number of bytes in a pointer.
Populating the Bitmaps
The first step to performing our tri-color marking is to populate the white and grey bitmaps for every block. We maintain all our blocks in a BlockSet structure. This structure has begin and end methods that let us iterate over the blocks in the set.
class BlockSet {
public:
  block_iterator begin();
  block_iterator end();

  // Given a pointer, find the block in which the pointer resides
  BlockInfo *block_for(const void *);
};
The BlockSet class also provides a function that, given a pointer, returns a pointer to the BlockInfo in which the pointer resides. We use this method when we follow roots and grey pointers. This method could be naively implemented as a linear search of the blocks. Another approach might be to ensure that all blocks are allocated on a boundary with an expected size. You can then mask off the lower bits of the pointer to effectively “round” the pointer to the block it belongs to.
The first step to populating the BlockInfo structures and performing our tri-color marking is to iterate over all the pointers in root set. This is a PointerSet of all pointers that do not reside within a block. For each of these roots we want to find the corresponding BlockInfo. We then get the allocated region from the block’s allocation structure and then fill this region in the block’s grey bitmap.
Once the root objects have been filled into their corresponding block’s grey bitmaps we scan the remembered sets of each block. Each remembered set contains pointers within the block. These pointers may point to other regions within the block or in other blocks. These are our initial white pointers. For each pointer in the remembered set of a block we set the corresponding bit in the block’s white bitmap.
void populate(const PointerSet &roots, BlockSet &blocks) {
  // Iterate over the pointers in the root set
  for (Pointer p : roots) {
    // Get the block that the root pointer points into
    block = blocks.block_for(p->ptr);

    // Get the allocation region being pointed to
    region = block->allocations.get_region(p->ptr);

    // Fill the bits in the grey bitmap corresponding to the
    // region pointed to by the root.
    block->grey_bitmap.fill(region, 1);
  }

  // Iterate over all the blocks
  for (BlockInfo *block : blocks) {
    // Iterate over this block's remembered pointers
    for (Pointer q : block->remembered) {
      // Set the pointer in the block's white set
      block->white_set[q] = 1;
    }
  }
}
As an example, imagine that we had a block that starts at the address 0x7f7d31941000. For simplicity we’ll say that the block is 256 bytes in size. We can visualize the block as follows, where each dot represents a pointer-sized number of bytes in the block, where a pointer is eight bytes in size.
7f7d31941000 ........ ........ ........ ........
Now we will populate our block with a number of allocations. Each allocation starts with a ^ character, with the rest of the allocated pointer-sized regions indicated by # characters.
7f7d31941000 ^####### ^###.... ^###^### ^###..^#
We’ll say that the first two allocations are our roots. We can depict this on our diagram by indicating them with a capital R.
             R        R
7f7d31941000 ^####### ^###.... ^###^### ^###..^#

  roots:
    0x7f7d31941000
    0x7f7d31941040
We’ll say that our roots each contain a pointer at the end which point to the two subsequent allocations. As these are pointers within the block, these are tracked in the block’s remembered set. We’ll mark these with a lower-case r in our diagram.
             R      r R  r
7f7d31941000 ^####### ^###.... ^###^### ^###..^#

  roots:
    0x7f7d31941000
    0x7f7d31941040

  remembered set:
    0x7f7d31941038 -> 0x7f7d31941080
    0x7f7d31941058 -> 0x7f7d319410A0
We’ll add a final pointer at the start of the third allocation that points to the very last allocation in the block. This also becomes a remembered pointer.
             R      r R  r     r
7f7d31941000 ^####### ^###.... ^###^### ^###..^#

  roots:
    0x7f7d31941000
    0x7f7d31941040

  remembered set:
    0x7f7d31941038 -> 0x7f7d31941080
    0x7f7d31941058 -> 0x7f7d319410a0
    0x7f7d319410a0 -> 0x7f7d319410f0
The first step of the initialisation of the tri-color marking takes all the roots and fills them in to the grey bitmap of the block. We have two roots, the first is a 64-byte region and the second is a 32-byte region. We fill in the grey bitmap for the block with these regions.
             R      r R  r     r
7f7d31941000 ^####### ^###.... ^###^### ^###..^#
grey bitmap  TTTTTTTT TTTT---- -------- --------

  roots:
    0x7f7d31941000
    0x7f7d31941040

  remembered set:
    0x7f7d31941038 -> 0x7f7d31941080
    0x7f7d31941058 -> 0x7f7d319410a0
    0x7f7d319410a0 -> 0x7f7d319410f0
The next step of the initial population of the bitmaps marks the remembered pointers in the white bitmap of each block. This sets the bit in the white bitmap corresponding to the position of a remembered pointer. We can add this to our diagram.
             R      r R  r     r
7f7d31941000 ^####### ^###.... ^###^### ^###..^#
grey bitmap  TTTTTTTT TTTT---- -------- --------
white bitmap -------T ---T---- T------- --------

  roots:
    0x7f7d31941000
    0x7f7d31941040

  remembered set:
    0x7f7d31941038 -> 0x7f7d31941080
    0x7f7d31941058 -> 0x7f7d319410a0
    0x7f7d319410a0 -> 0x7f7d319410f0
With the white and grey bitmaps populated for the start of the tri-color marking we can commence with the marking process.
The marking process goes through each block that still has bits set in it’s grey bitmap.
For each block, the process merges the grey bitmap into the black bitmap. This has the effect of marking the grey regions as black.
The process then intersects the white and grey bitmaps to find the pointers that need to be promoted to the new grey bitmap.
Once this set has been found, it clears the block’s grey bitmap. Then, given the set of pointers that need promoting, iterate through each pointer in the bitmap and promote it to the grey set.
void mark_block(BlockInfo *block, BlockSet &blocks) {
  // Merge the grey bitmap into the black bitmap
  block->black_set = block->black_set.union_with(block->grey_set);

  // Intersect the white bitmap with the grey bitmap
  marked = block->white_set.intersect_with(grey);

  // Clear the block's grey bitmap
  block->grey_set.clear();

  // Iterate over the marked white pointers and promote them
  for (Pointer q : marked) {
    promote(q, block, blocks);
  }
}
Let’s work through this process with our example block. The first step is to union the grey bitmap into our grey bitmap. Our black bitmap was originally empty, so it just assumes the values of the grey bitmap.
             R      r R  r     r
7f7d31941000 ^####### ^###.... ^###^### ^###..^#
grey bitmap  TTTTTTTT TTTT---- -------- --------
white bitmap -------T ---T---- T------- --------
black bitmap TTTTTTTT TTTT---- -------- --------
We then take the intersection of the white and grey bitmaps to find which pointers we should promote to grey. This creates a new bitmap that is called marked in the code above.
             R      r R  r     r
7f7d31941000 ^####### ^###.... ^###^### ^###..^#
grey bitmap  TTTTTTTT TTTT---- -------- --------
white bitmap -------T ---T---- T------- --------
black bitmap TTTTTTTT TTTT---- -------- --------
marked       -------T ---T---- -------- --------
This has marked the pointers in the remembered set that reside within the regions pointed to by the roots. These are the first two remembered pointers.
We next clear the grey bitmap for the block.
             R      r R  r     r
7f7d31941000 ^####### ^###.... ^###^### ^###..^#
grey bitmap  -------- -------- -------- --------
white bitmap -------T ---T---- T------- --------
black bitmap TTTTTTTT TTTT---- -------- --------
marked       -------T ---T---- -------- --------
Next we iterate over the pointers in the marked bitmap and promote them to the grey set. We do this using a promote() function.
The promote function takes a pointer that we want to promote (called q) and the block we found it in. The promotion first finds the block that the pointer points to and fills in the allocated region in the target block’s grey bitmap. This marks the region as grey in the target block. We then clear the corresponding bit in the originating block’s white bitmap to indicate that the pointer has been processed and is no longer in the white set.
void promote(Pointer q, BlockInfo *block, BlockSet &blocks) {
  // Find the block that is being pointed to by 'q'
  target = blocks.block_for(q.ptr);

  // Get the region that is being pointed to by 'q'
  region = target->allocations.get_region(q.ptr);

  // Fill the region in on the target block's grey bitmap
  target->grey_set.fill(region, 1);

  // Clear the bit in the white bitmap corresponding to 'q'
  block->white_set[q] = 0;
}
Let’s work through this process using our example block. We have two pointers to promote, indicated by the bits in the marked bitmap we established in the mark_block function.
             R      r R  r     r
7f7d31941000 ^####### ^###.... ^###^### ^###..^#
grey bitmap  -------- -------- -------- --------
white bitmap -------T ---T---- T------- --------
black bitmap TTTTTTTT TTTT---- -------- --------
marked       -------T ---T---- -------- --------

  remembered set:
    0x7f7d31941038 -> 0x7f7d31941080
    0x7f7d31941058 -> 0x7f7d319410a0
    0x7f7d319410a0 -> 0x7f7d319410f0
The first pointer is located at 0x7f7d31941038. This is one of our remembered pointers, which points to the allocated region of 32 bytes at 0x7f7d31941080 within the same block. We mark this region in the grey bitmap and then clear the bit in the white bitmap corresponding to the pointer at 0x7f7d31941038.
             R      r R  r     r
7f7d31941000 ^####### ^###.... ^###^### ^###..^#
grey bitmap  -------- -------- TTTT---- --------
white bitmap -------X ---T---- T------- --------
black bitmap TTTTTTTT TTTT---- -------- --------
marked       -------T ---T---- -------- --------

  remembered set:
    0x7f7d31941038 -> 0x7f7d31941080
    0x7f7d31941058 -> 0x7f7d319410a0
    0x7f7d319410a0 -> 0x7f7d319410f0
The next pointer indicated in the marked set is located at 0x7f7d31941058 and points to the 32-byte allocation starting at 0x7f7d319410a0. Again we mark this region in our grey bitmap and clear the bit corresponding to the pointer at 0x7f7d31941058 in the white bitmap.
             R      r R  r     r
7f7d31941000 ^####### ^###.... ^###^### ^###..^#
grey bitmap  -------- -------- TTTTTTTT --------
white bitmap -------X ---X---- T------- --------
black bitmap TTTTTTTT TTTT---- -------- --------
marked       -------T ---T---- -------- --------

  remembered set:
    0x7f7d31941038 -> 0x7f7d31941080
    0x7f7d31941058 -> 0x7f7d319410a0
    0x7f7d319410a0 -> 0x7f7d319410f0
At the end of the first pass of the tri-color marking process the black bitmap contains our root objects and two of the white objects have been promoted to the grey set, removing the pointers from the white bitmap.
             R      r R  r     r
7f7d31941000 ^####### ^###.... ^###^### ^###..^#
grey bitmap  -------- -------- TTTTTTTT --------
white bitmap -------- -------- T------- --------
black bitmap TTTTTTTT TTTT---- -------- --------

  remembered set:
    0x7f7d31941038 -> 0x7f7d31941080
    0x7f7d31941058 -> 0x7f7d319410a0
    0x7f7d319410a0 -> 0x7f7d319410f0
Now the tri-color marking process can commence again, as the grey bitmap is not empty. As before we first union the black and grey bitmaps to mark the grey regions for retention.
             R      r R  r     r
7f7d31941000 ^####### ^###.... ^###^### ^###..^#
grey bitmap  -------- -------- TTTTTTTT --------
white bitmap -------- -------- T------- --------
black bitmap TTTTTTTT TTTT---- TTTTTTTT --------
We then take a union of the grey and white bitmaps to find the white pointers that we want to promote. We then clear the grey bitmap.
             R      r R  r     r
7f7d31941000 ^####### ^###.... ^###^### ^###..^#
grey bitmap  -------- -------- -------- --------
white bitmap -------- -------- T------- --------
black bitmap TTTTTTTT TTTT---- TTTTTTTT --------
marked       -------- -------- T------- --------
Finally we iterate through the white pointers indicated in the marked bitmap and promote them to the grey bitmap. We only have a single pointer now, being the pointer at 0x7f7d319410a0 which points to the 16-byte allocation at 0x7f7d319410f0.
             R      r R  r     r
7f7d31941000 ^####### ^###.... ^###^### ^###..^#
grey bitmap  -------- -------- -------- ------TT
white bitmap -------- -------- X------- --------
black bitmap TTTTTTTT TTTT---- TTTTTTTT --------
marked       -------- -------- T------- --------

  remembered set:
    0x7f7d31941038 -> 0x7f7d31941080
    0x7f7d31941058 -> 0x7f7d319410a0
    0x7f7d319410a0 -> 0x7f7d319410f0
At the end of the second pass we have the last allocation in our grey bitmap and our black bitmap has been expanded with two more allocations. Our white set is now empty.
             R      r R  r     r
7f7d31941000 ^####### ^###.... ^###^### ^###..^#
grey bitmap  -------- -------- -------- ------TT
white bitmap -------- -------- -------- --------
black bitmap TTTTTTTT TTTT---- TTTTTTTT --------

  remembered set:
    0x7f7d31941038 -> 0x7f7d31941080
    0x7f7d31941058 -> 0x7f7d319410a0
    0x7f7d319410a0 -> 0x7f7d319410f0
One final pass of the tri-color marking is performed as the grey bitmap is not yet empty. As before we union the grey bitmap into the black bitmap to mark the grey allocations for retention. We then intersect the white and grey bitmaps to find pointers that we want to promote and clear the grey bitmap. This results in an empty mark set, as there are no more white pointers that intersect with the grey bitmap.
             R      r R  r     r
7f7d31941000 ^####### ^###.... ^###^### ^###..^#
grey bitmap  -------- -------- -------- --------
white bitmap -------- -------- -------- --------
black bitmap TTTTTTTT TTTT---- TTTTTTTT ------TT
marked       -------- -------- -------- --------
As there are no marked pointers there’s nothing left to promote, and the tri-color marking process has come to an end after three iterations.
After the marking process has completed we begin our sweep. This process iterates through the allocations in the all the blocks and check them against the black bitmap. Any allocation that cannot be found in the black bitmap is deallocated.
void sweep(BlockSet &blocks) {
  for (BlockInfo *block : blocks) {
    for (Region alloc : block->allocations) {
      if (!block->black_set[alloc.start]) {
        block->free(alloc);
      }
    }
  }
}
Taking a look at our black bitmap at the end of the tri-color marking process we can see that one of our allocations will be freed.
             R      r R  r     r
7f7d31941000 ^####### ^###.... ^###^### ^###..^#
black bitmap TTTTTTTT TTTT---- TTTTTTTT ------TT
                                        XXXX
Lingering Thoughts
I abandoned this approach to tri-color marking in it’s current guise. The process of performing the actual marking was, for most of my tests, quite performant for my needs. However, I found that the GC it was implemented in had a number of significant performance issues. Most of these were due to the way I’d implemented the GC, rather than specifically with the bitmap-based approach to tri-color marking.
Too Many Variables and Not Enough Rigour
Fine-tuning all the variables in the GC didn’t go well. There were quite a few variables, such as the size of each allocation cell in a page, the size of these pages, and so on. I never seemed to be able to balance these variables to provide a general configuration that was suitable for the range of workloads I anticipated.
I’m sure that I could have tuned these variables by taking a more rigorous approach to the design and testing of the GC. Better yet, a smarter GC could have tuned itself to a certain extent based on how it was being used. More likely would be that I would never find a “best fit” set of parameters, but I might learn something along the way.
Maintaining Remembered Sets
In order to be able to populate the white set with pointers in each block I decided to use smart pointers. This ended up being a terrible decision. The problem was exacerbated by these pointers being passed around all over the place. Turns out programs do this a lot. Who knew.
The smart pointer itself didn’t know whether it was actually in the heap or on the stack, so it attempted to register and deregister itself from the GC every time it was constructed and destructed. This meant that there were a terrible number of calls to the GC to register and unregister these blasted smart pointers.
When the GC found that a pointer resided within an actual block it would need to add the pointer to the remembered set. Moreover, it would also need to remove pointers from the remembered set when a pointer was destructed. To keep things consistent, access to the remembered set of each block was synchronized by a mutex…
Well I’m sure I don’t need to go into too much embarrassing detail, but the result was that every thread spent a great deal of time contending for access to a handful of mutexes.
This was a very poor concurrent design decision that I didn’t realise until much later on in performance testing. I really should have known better.
I think that a more suitable approach would have been to simply stop the world and have each block scan itself for pointers. This could have been really quite quick, especially with multiple GC threads. As we’d be stopping the world, we might as well scan the stack and registers of each thread while we’re at it.
You know, like nearly every other GC does.
Not Incremental or Concurrent
Because I was treating the tri-colour marking process as distinct from the allocator and mutator, the GC was constantly re-building white and grey bitmaps for every block, ever time it entered into a GC pass.
A lot of the work of maintaining the initial white bitmap at least could have been done by the allocator.
The GC was also not incremental: there was no provision in the design for only doing a bit of the GC process.
The marking process as implemented did not lend itself to being concurrent. I did make a poor attempt to make the marking process concurrent. My initial feeble attempt was to run the marking process of each block concurrently, over a set of worker threads. Of course, because I’d not actually thought this through, I ended up making the same mistake I’d made with the smart pointers.
The problem was that the marking process synchronizes the blocks by their grey bitmaps in the promote function. When we promote a white pointer, we fill in the grey bitmap of the pointed to block. This means that we can end up filling in the grey bitmap of a block being processed by another thread. I did find a few alternatives to this, such as work queues and incoming grey bitmaps, but it really seemed to be a bit of a hopeless pursuit by that point.
No Generations
I’ve saved what I felt was the the best for last: one of the biggest failings of this implementation was that there’s no consideration of object generations.
The generational hypothesis lends us a great advantage. If you’ve not heard of it, the generational hypothesis states that the objects we’re most likely to deallocate are those which we’ve only just allocated. Put another way, most objects will have short life-times. Objects that survive the first few collections will likely live for quite a long time.
The upshot of this is that objects which are retained beyond an initial one or two passes of the GC should be moved to a subsequent generation. These later generations can be collected with a lower frequency.
Conclusion
I think that the bitmap based marking is a nice approach to tri-color, as the marking process is quite efficient. It requires virtually no memory allocation beyond a few bitmaps, and those can be allocated along with the block and reused for each pass. The main bottleneck ended up being the promotion of white pointers.
I may visit some of my other disastrous attempts to write a GC and some of the things I’ve learned along the way in subsequent posts. There are a few things that I think might be useful to document.